Help Contents
- Introduction
- Setup
- Log in page
- Availability Calendar
- Rate Quote page
- Tracker page
- Manage Trackers page
- Manage Email page
- Rate Settings page
- Owners settings page
- Log out page
- Embedding controls into your website
- Additional help
Introduction
Managing a vacation rental means keeping track of a lot of details. Have you ever woken up in the middle of the night in a panic thinking "Oh my gosh, did I send them their check in instructions?" Do you think it takes too much work to respond to all of those inquiries? Are you tired of managing a bunch of calendars for all of your advertising sites? Are you tired of sending out the same emails over and over again? VRonTrack.com was created to help you with all of that and more. With a single login to VRonTrack.com you can keep track of everything you need to, and get reminders when things need doing. You get a single place to keep track of all of your reservations, and keep your other sites in sync with your calendar. You can generate quotes automatically, and create email templates for all of those emails you send over and over again. VRonTrack.com helps you manage your rental in less time than you ever thought possible.
Setup
You can setup your VRonTrack account to work in a lot of different ways. Which way you decide to use VRonTrack depends on a number of factors. You can use all of the features or just the ones you want.
If you decide to use VRonTrack for an availability calendar, you will need to set your calendar options. This is done on the Owners settings page.
If you decide to use VRonTrack to generate quotes, you will need to set up your rate information. This is done on the Rate Settings page.
If you decide to use VRonTrack to send your emails, you will need to set up email templates on the Manage Email page. Two templates are already set up for you to use when sending quotes for available days, and when sending about unavailable days. You probably want to edit those to more precisely meet your needs. You can set up as many templates as you need for all of the common emails you need to send.
If you decide to use VRonTrack to keep track of your to-dos on each reservation, you will need to add tracker columns using the Manage Trackers page. You can add a column for anything you need to keep track of.
One important thing to know about when using VRonTrack.com is that any data you enter on any page will not become permanent until you have clicked the "update" button. If you click on any other button or go to a new page before clicking on the update button, any new data you have entered will be lost.
Log in page
The log in page is the only page available until you have logged in. Enter the log in name and password that was contained in your welcome email. After you have logged in once on a given device you will not need to log in again. If you are using your account from a shared computer or in a public environment you should always log out when you are finished. Once logged in you will be able to change your password to something that is private.
Availability Calendar
Calendar programs on the Internet talk to one another using a standard called iCal. You can pick one of your calendars to be your master calendar, and then set your other calendars to be driven from that master calendar iCal feed. This way you only need to make changes to your master calendar, and all of the other calendars using that master iCal feed will automatically remain in sync. iCal is supported by all the major vendors; HomeAway, VRBO, FlipKey, AirBnB, Google, Apple, Microsoft, Yahoo and others.
VRonTrack can be used both as a master calendar, and a calendar driven from another master calendar. When used as a master calendar, the reservations you enter into VRonTrack will show on your VRonTrack calendar (which you can embed into other web sites as well) and come out as your iCal source to drive any other calendars you might have like FlipKey, AirBnB, Google, or Apple for your smart phone. When driven by some other iCal feed, VRonTrack will show those reservations on your VRonTrack calendar, and the reservation data you enter will act as ancillary data to those reservation dates. Setting your iCal options is done on the Owners settings page.
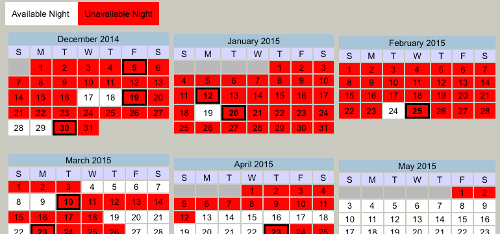
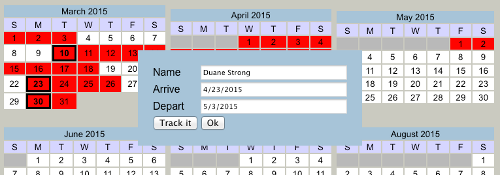
Arrive dates are highlighted on the calendar. Clicking on these will show the name and dates of the reservation as supplied by the iCal feed. Clicking on the "track it" button will bring up that reservation data or allow you to create a new reservation from the name and dates supplied. Hint: for a new reservation of a repeat guest, click the "find" button to get the existing customer information.
Your availability calendar can also be embedded into your website or Wordpress blog. This calendar does not show owner information such as reservation names. See Embedding controls into your website.
Many rental calendar programs on the Internet work with booked nights rather that arrive and depart dates. This means that they do not include the last depart day in the calendar information. This is the format that VRonTrack normally expects, and outputs as your iCal source. If you are using a calendar as your master calendar that does output the depart day, you can set "Show end date available" in your owner settings to make VRonTrack not show that end date as booked and unavailable. This will allow you to have same day turn-overs. If you want VRonTrack to output the depart day in your iCal source, you can use the alternate iCal source URL that has the word 'days' in it like http://VRonTrack.com/icaldays.php?id=1 .
Rate Quote page
The Rate Quote page allows you to automatically compute a quotation for emailing to a customer. Enter the arrive and depart dates by either typing them into the boxes or clicking on the calendar icons to pop up a date selection calendar. On the date selection pop up, click on the month and day and the red arrows to change the year.
For each fee that you have setup, click to enable or disable it being added to the fee subtotal.
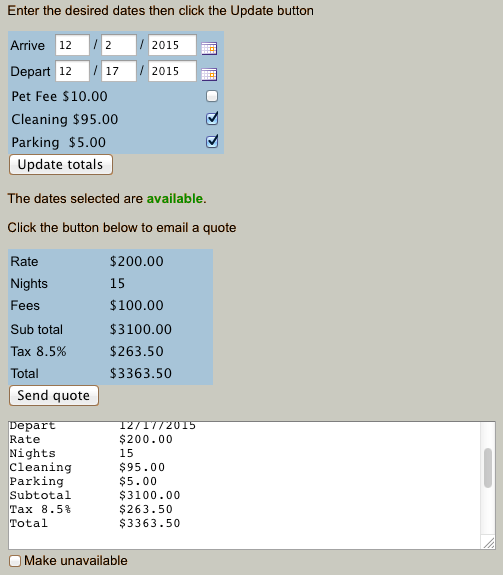
Once the required dates are entered, click on the "Update totals" button to automatically compute the quotation. The results box will be filled in with the quotation values, and the availability calendar will be checked for free dates. A green "dates available" will display or a red "dates unavailable" will display with a link to the availability calendar. You can click the "Make Unavailable" box to change the message to use the unavailable email template even if the dates are really available. You will not be able to send an available quote if your calendar shows the dates as unavailable, in this case you must click the "Make Unavailable" in order to send the email.
The amount for the stay is computed from rules set on the Rate Settings page. If the arrive date is less that the defined pre-pay days away, the pre-pay warning message will be displayed to warn you that the reservation must be pre-paid. If the dates are within one of the defined black out periods, a warning message will display to inform you that the reservation is not available or restricted.
The quotation summary text box is filled with the template text defined using the Manage Email page for the template named "available". The {quotation} keyword of the template will be expanded with the quotation details. This text box may be edited before sending, and can be cut and then pasted into an existing email thread. To create a new email click the "Send quote" button to bring up a box where the name and email address of the inquirer can be entered. From this box either the "Create quote email" or "Send quote email" buttons may be clicked to send a new email. Clicking either of these will expand the {email} and {first_name} {last_name} and all owner keywords of the email template and use the subject, cc, and bcc fields of the template when sending the email. See the Manage Email page for more information on the different ways of sending the quotation email.
Your rate quotation widget can be embedded into your website or Wordpress blog for inquiry use. See Embedding controls into your website.
Tracker page
The tracker page shows all reservations entered into the tracker. It shows one page for each year. The next and previous year buttons at the bottom are used to scroll between year pages. The reservations are listed in order of arrive date. By default, each reservation is displayed with the first and last name, arrive and depart dates. Clicking on any of these will bring up the details for that reservation where you can add or edit information, send emails to that guest, or delete the reservation from the tracker. Additional tracker categories can be added by clicking the "Edit trackers" button at the bottom. For each tracker category you add, the trackers page will show a column with the category name, and if a URL was supplied when you created the category, the name will be highlighted. Clicking on the category name will open a web browser page to that URL. This gives you a quick way to get to other web pages that you need to manage like PayPal, or another master calendar site. New reservations can be added to the tracker by clicking the 'New reservation" button at the bottom.
Each box on the tracker page lets you mark off categories as done for each reservation with a check mark. If you have set reminder days on the category, the box will turn yellow to let you know it is overdue if it has not been marked done. If you have enabled reminder emails, those items will be sent to your email inbox every night to remind you until they are checked done.
Manage Trackers page
From the trackers page, clicking "Edit trackers" will bring you to the edit tracker categories page. Here you can add or edit additional tracker page category columns. The Heading field will be the name of the category column shown on the tracker page. Keeping them short will let you pack more columns on the page without scrunching them down. The Link field is an optional URL to a web site where you might need to go in order to accomplish the task that the column represents. The Arrive reminder and Depart reminder fields are optional fields where you can specify the number of days before the arrive or depart where you would like to be reminded by the tracker check box turning yellow, or if enabled, reminder emails being sent to you. Using a negative number of days will remind you that number of days after arrive or depart.
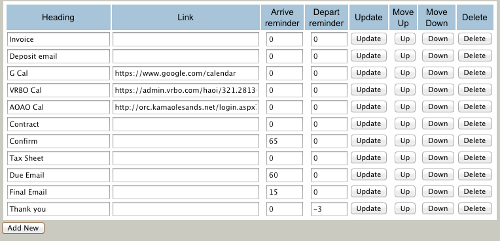
As always you need to click on the update button for any changes to be recorded. Clicking on the up or down buttons will move that category up or down in the list, and the order of the columns on the tracker page. Clicking delete will remove the tracking category and remove all check mark data for that category from the database forever.
Manage Email page
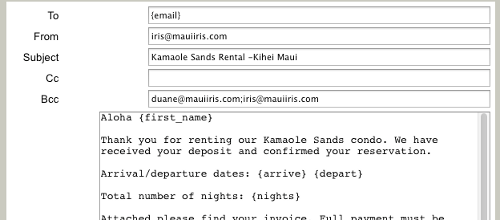
The manage email page is where you create or edit email templates. Email templates are used to send emails where you supply a standard block of text, email addresses, and subject but parts of those can be filled in with data from the reservation or quotation. This is done by inserting special keywords into your standard text. Keywords have braces around them {like_this} and will be replaced by the data named in the keyword. You can use the blank email form to send an email (although this does not gain you much over just using your normal email program) or you can click on the "use" button of one of your email templates to have that template filled in with the reservation data. The "use" button will only be active if you clicked the "Email" button on one of your reservations (by clicking on the name in the tracker page) since you can only use a template for a given reservation. You can create, edit, and delete templates at any time.
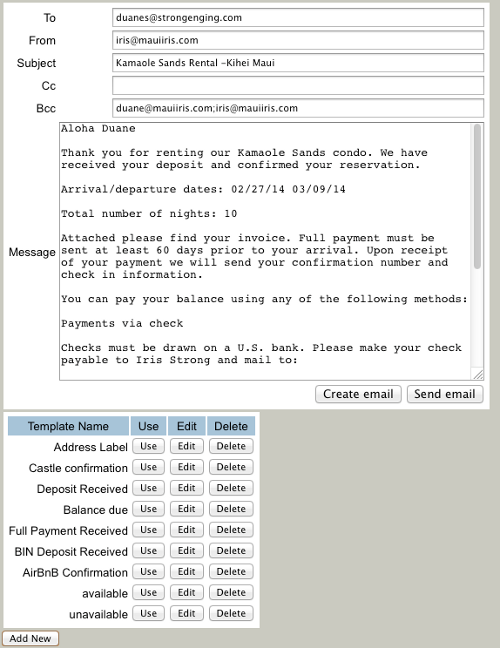
Clicking "Add New" at the bottom of the page will add a new template named "new template". Clicking on the "Edit"button of the new template will let you edit the standard text and keywords of the template. The "Insert Field" button will drop down to show a list of available keywords, and if one is selected it will be added to the end of the current message text, or you can just type them in. You can use keywords anywhere in the message text, to, from, subject, cc or bcc fields or you can just put in whatever text you want to always use. Before you click the "Save Template" button you can change the name of the template as it will appear in the list.
When you use an email template you have options on how you would like to email it. Your first option is to edit the text in the message box any way you like before sending it. You can change what was created from the template, add extra info etc. You can cut and paste this text into an existing email thread if you are responding to an inquiry for example. If you want to create a new email from the template from scratch, you can click the "Create email" or "Send email" buttons. Each one acts differently.
"Create email" vs. "Send email" buttons
The "Create email" button will launch the local email program on your computer and fill in a new email with the template information.- + Uses your favorite email program to send the email
- + Allows you to attach files to the email
- + Keeps a history of sent emails on your computer
- - Requires that your computer be setup with an email program
- - Requires that you navigate through your email program
- - Has problems in some versions of Chrome browser
- + Can be used from any computer even in public kiosks
- + No setup required
- + Fewest clicks to send an email
- + Works in any browser
- - Can not attach files to the email
- - No history of sent emails kept (but you can bcc to your email account)
Rate Settings page
The rates settings page lets you setup how quotations will be calculated.
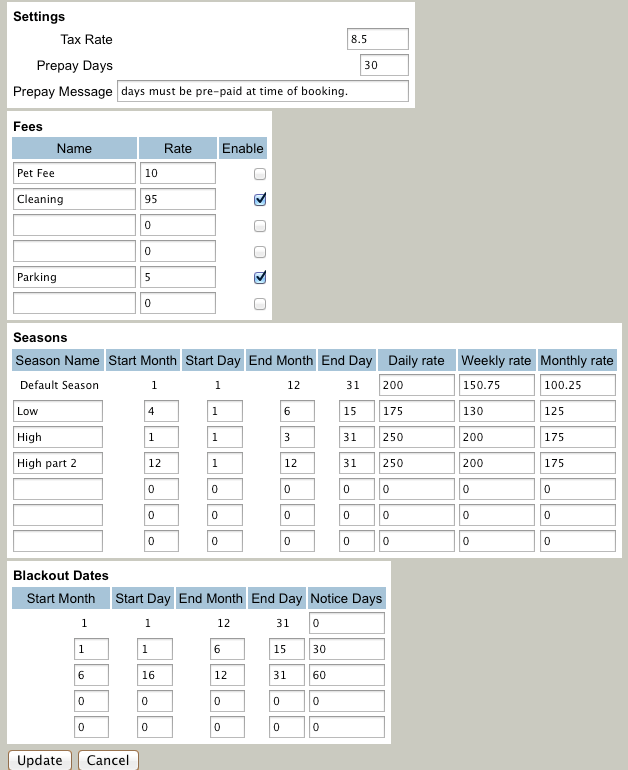
Tax Rate
This percentage will be applied to the subtotal to form the total amount.Prepay days
If you require pre-payment if the arrive date is less than a certain number of days away, then enter a non zero number of days here and a warning message will appear when making the quotation.Fees
Up to 6 extra fees can be set. These will appear on the quotation page and will be added to the fee subtotal if the fee check box has been checked. They will also be individually broken out in the rate summary that becomes part of the quotation email. Use the enable setting to set if that fee starts off initially checked or if it should be initially off and must be checked to add it to the fee subtotal. To disable a fee set a rate of zero.Seasons
In the standard rate computation algorithm, the arrive date is checked to see if it falls into one of the defined seasons. The rates set in that season are used, and are applied to the number of nights comprised in the reservation. The daily rate is used for stays less than 7 nights. The weekly rate is used for stays of 7 to 28 days. The monthly rate is used for stays over 28 nights. If the arrive date does not fall into one of the defined seasons, then the default season rates are used. You can not enter an end date that is earlier than a start date. If you have a season that spans the end of one year and the start of the next, you must create two seasons, one for the dates to the end of the year and another for the dates from the start of the year using the same rate values. To disable a season set any of the date values to zero.Black out periods
If you have times during the year where you are restricted from taking reservations less that a certain number of days away, you can enter those times and the number of notice days. If the arrive date is less that the notice days away from one of your black out times, a warning notice will display (to the owner only) when making the quotation.Owners settings page
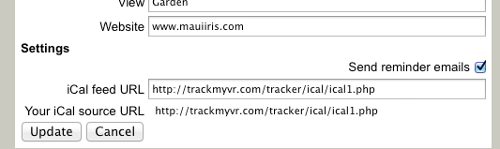
The owner settings page is where you set your contact information, your email for reminder messages, and information about your rental (for future search pages). You can also enable reminder emails to be sent, and set the iCal feed URL for your availability calendar.
You can set your iCal feed URL to be either from an external master calendar (like HomeAway, VRBO, or Google Calendar) or you can set it to your internal iCal source as shown just below the iCal feed field. Using an external iCal feed will show reserved dates on your availability calendar as they appear on that external calendar. To get these reservations into the tracker database, you have to click on the arrive date in the calendar, and click the "track it" button to create a reservation in the database. Until you have done that step, reservations on the calendar are not tracked in the database and are not supplied as part of your internal iCal source. Once a reservation has been created either from the external iCal feed as described above or simply added with "new reservation" it will be tracked and sent out as your iCal source. You can use your iCal source as a master calendar to feed other iCal calendars you may have.
Many rental calendar programs on the Internet work with booked nights rather that arrive and depart dates. This means that they do not include the last depart day in the calendar information. This is the format that VRonTrack normally expects, and outputs as your iCal source. If you are using a calendar as your master calendar that does output the depart day, you can set "Show end date available" to make VRonTrack not show that end date as booked and unavailable. This will allow you to have same day turn-overs. If you want VRonTrack to output the depart day in your iCal source, you can use the alternate iCal source URL that has the word 'days' in it like http://VRonTrack.com/icaldays.php?id=1 .
To get the iCal feed from a HomeAway or VRBO calendar, follow the instructions here.
To get the iCal feed from an AirBnB calendar, follow the instructions here.
To get the iCal feed from a Google calendar, follow the instructions here.
Log out page
Logging out will disable the computer from accessing your account data. Until you log out, anyone using that computer will have access to your account data and be able to make changes. If the computer is not kept in a secure place, or monitored by you at all times you should log out when you are done. Logging out from one computer will not automatically log you out from every computer you were logged into. You can have multiple people you delegate track your reservations from any computer on the Internet by giving them your login name and password. You can change your password at any time to disable access by anyone, even if they are logged in.
Embedding controls into your website
Your availability calendar can be embedded into your website or Wordpress blog in three different sizes. Use the following code as a guide. Replace the URL after the ical= with the iCal feed you want to display. Size can be small, medium, or large. Note that the iCal URL does not have to be only from VRonTrack, any iCal feed URL will work. In Wordpress make sure to use the "text" tab to add the code below (also check out our Wordpress plugin).
Small
<iframe
src="http://VRonTrack.com/embedAvailabilityCalendar.php?ical=http://VRonTrack.com/tracker/ical/ical1.php&size=small"
width="370" height="800" frameborder="0" marginwidth="10" marginheight="0" scrolling="yes"
>
</iframe>
Medium
<iframe
src="http://VRonTrack.com/embedAvailabilityCalendar.php?ical=http://VRonTrack.com/tracker/ical/ical1.php&size=medium"
 width="500" height="900" frameborder="0" marginwidth="10" marginheight="0" scrolling="yes">
>
</iframe>
Large
<iframe
src="http://VRonTrack.com/embedAvailabilityCalendar.php?ical=http://VRonTrack.com/tracker/ical/ical1.php&size=large"
width="600" height="1100" frameborder="0" marginwidth="10" marginheight="0" scrolling="yes">
>
</iframe>
Your quotation widget can be embedded into your website or Wordpress blog. Use the following code as a guide, replacing the property id with yours. Your website users can use the widget to calculate a quotation and email a request to you. The email you receive contains their name and email address, and the text of the quotation with a message indicating if the dates are avaialable on your calendar. Most of the time you can simply reply the email back to the inquirer and it will already contain all necessary information. In Wordpress make sure to use the "text" tab to add the code below.
<iframe src="http://www.VRonTrack.com/embedQuote.php?id=1"
width="450" height="450" frameborder="0" marginwidth="10" marginheight="0" scrolling="yes">
</iframe>